
El Nido is one of the most beautiful places in Palawan, Philippines, featuring towering karst mountains, turquoise lagoons, incredible coral reefs, and colorful fish.
One of the most popular activities to do during any El Nido itinerary is to go on an island hopping tour. It’s easy to see why, as the islands here are truly out of this world, with some of the clearest and bluest water you’ll ever see!
Aside from visiting the islands, there are plenty of other activities to enjoy such as exploring the beautiful beaches on the mainland, hiking to a panoramic viewpoint, or taking a dip in a waterfall surrounded by the lush jungle.
If you’re visiting soon, this guide will show you exactly how to plan your 3 or 4 days in El Nido itinerary, including useful tips on how to get there, where to stay, and more.
Read more about Palawan Philippines:
- Comprehensive guide to El Nido Tour A
- Everything you need to know about El Nido Tour C
- Best 10 day Palawan itinerary for first-timers
- Port Barton travel guide
***This article may contain affiliate links, meaning each time you click through and make a purchase, I earn a small commission at no extra cost to you which helps a lot in keeping this website running. Thank you for your support :)
El Nido Travel Essentials
Recommended activities and tours in El Nido:
- Island Hopping Tour A, Tour B, and Tour C (cheaper when booking online)
- El Nido Combined Tour A and C
- El Nido Tour D (least crowded tour)
- Taraw Cliff Canopy Walk and Viewpoint (cheaper when booking online)
- Jeepney Tour of El Nido Beaches and Waterfall
Where to stay in El Nido:
- Luxury: Lihim Resorts
- Mid-range: Cadlao Resort
- Budget: Frendz Hostel or Spin Designer Hostel (dorm and private rooms)
How to get to El Nido:
How many days in El Nido is enough?
I recommend spending at least 3 days in El Nido. But with 4 days you’ll have more than enough time to explore the attractions on the mainland and do two island hopping tours.

Below is a suggested 3 or 4 day El Nido itinerary:
Day 1: Visit the beaches near El Nido Town: El Nido Beach, Corong Corong Beach, Vanilla Beach, or Las Cabanas Beach
Day 2: El Nido Island Hopping Tour A
Day 3: El Nido Island Hopping Tour C
Day 4: Taraw Cliff viewpoint, Lio Beach, Bulalacao Waterfall, Nacpan Beach
4-Day El Nido Itinerary: Day 1
Visit the beaches near El Nido Town
Start your 4 day El Nido itinerary by exploring some of the beaches near El Nido Town.
There are several beaches to choose from depending on your preferences. Below I’ll walk you through them:
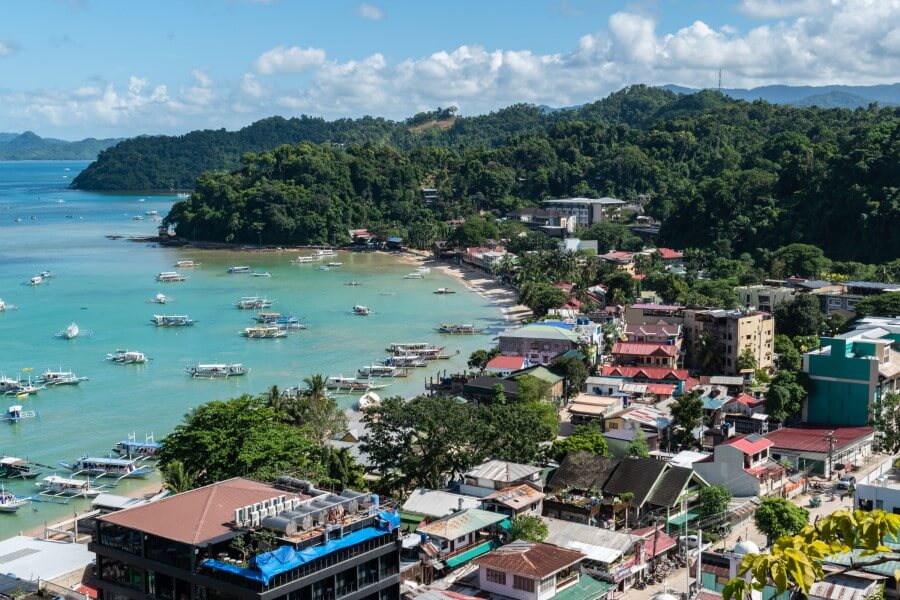
El Nido Beach
This beach is the closest to El Nido Town and is mainly used as a pick-up and drop-off point for the El Nido island hopping tours.
Although the scenery here is beautiful with the limestone mountains and turquoise waters, it’s not ideal for swimming due to the boats covering the main strip.
Nevertheless, it’s still a great place spot to hang out, especially in the evening as there are lots of restaurants and bars lining the beach.
Vanilla Beach and Las Cabanas Beach
Vanilla Beach, also known as Marimegmeg Beach, is one of my favorite beaches in El Nido, and I highly recommend visiting it during your El Nido itinerary.
It has soft powdery white sand and crystal-clear turquoise water, which makes it perfect for swimming.
The beach is also clean and the waves aren’t rough. However, the restaurants and bars here are slightly expensive, so if you’re on a budget, I suggest bringing a packed lunch.

It can also get a bit crowded during sunset, so it’s best to arrive early to secure a good spot.
On the western end of Vanilla Beach is Las Cabanas Beach, which offers an even better sunset view.
During low tide, you can walk across the sandbar that connects the beach to a small island.
Still, if you’re feeling adventurous, I recommend trying the zipline instead. The price of the zipline starts at 600 pesos one way or 1,000 pesos for a round trip.

Corong Corong Beach
Located about a 5-minute drive from El Nido Town is Corong Corong Beach.
Although the beach is not suitable for swimming due to its rocky nature, it serves as a perfect location to enjoy the sunset.
If you want to swim, I recommend renting a kayak from Corong Corong Beach and heading to the nearby beaches such as Lapus Lapus, Papaya, or Seven Commandos Beach.
It’s worth noting that Seven Commandos Beach is included in the El Nido Tour A, so you may want to skip it for today if you’re already planning to book Tour A.

Explore El Nido Town
End the first day of your El Nido itinerary by exploring El Nido Town. The town comes alive at night and features a wide selection of restaurants, street food stalls, and bars.
My favorite place to eat in town is the spring roll stall found at the entrance of El Nido Beach. The food available here is both cheap and delicious, with each piece costing only 10 pesos.
Maa’s Grill is also another great place to eat Filipino food at affordable prices or Basil’ Pizza & Pasta El Nido for delicious wood-fired pizza.
4-Day El Nido Itinerary: Day 2
No trip to El Nido would be complete without doing at least one island hopping tour. There are four tours available – Tour A, B, C, and D. Below are the places you’ll visit on each tour:
Tour A: Big Lagoon, Secret Lagoon, Seven Commandos Beach, Shimizu Island, Payong-Payong Beach. BOOK HERE
Tour B: Entalula Island, Snake Island, Cudugnon Cave, Cathedral Cave, Papaya Beach. BOOK HERE
Tour C: Helicopter Island, Hidden Beach, Secret Beach, Matinloc Shrine. BOOK HERE
Tour D: Cadlao Island, Small Lagoon, Nat Nat Beach, Paradise Beach, Bukal Island. BOOK HERE
Most travel agencies in El Nido offer the same price for each tour (I personally checked while I was there) so if you want to save money, I recommend booking your tour on Klook here to get a discount!
All tours include a buffet lunch, life jacket, and a licensed tour guide.

El Nido Tour A
For day 2, I recommend booking Tour A to witness some of the most beautiful beaches and lagoons in and around El Nido.
Tip: I recommend booking your tour in advance on Klook here as it costs only 950 pesos compared to 1,200 pesos when booking in person!
CLICK HERE TO BOOK EL NIDO TOUR A
Note that the tour price doesn’t include the entrance fee for the Big Lagoon and eco-tourism development fee.
Both will cost an extra 200 pesos each, bringing the total price of the tour to 1,350 pesos if you book on Klook or 1,600 pesos if you book in El Nido.
Tip: The eco-tourism development fee can also be used for tours B and C and is valid for 10 days.

Tour A is the most popular tour in El Nido, so it can feel a bit crowded. However, it’s worth it if you want to see some of the most stunning beaches and clearest water.
Below are the spots you’ll visit on Tour A:
Big Lagoon: This was one of the highlights of my 4 days in El Nido! Here you’ll kayak through a turquoise lagoon flanked by towering limestone cliffs. Be sure to turn left before reaching the end of the lagoon to see the cave tunnel. Note that the kayak costs an additional 300-400 pesos.
Seven Commandos Beach: Although located on the mainland, Seven Commandos Beach is only accessible by boat. It boasts soft white sand, crystal-clear water, and rows of palm trees. This is the only stop on the tour where you’ll have access to a toilet. There’s also a restaurant here where you can buy drinks and snacks.

Secret Lagoon: This spot is accessible through a small opening in the limestone cliffs. You do have to wade through water, so make sure you’re wearing water shoes to protect your feet from the sharp rocks.
Shimizu Island: Shimizu Island usually serves as the lunch spot. However, it’s too crowded, lunch will be served on Payong-Payong Beach instead.
Payong-Payong Beach: Another idyllic beach with jagged rock formations and turquoise waters.
Related post: Everything you need to know about El Nido Tour A
4-Day El Nido Itinerary: Day 3
El Nido Tour C
Another day, another island hopping tour! Kick off the third day of your El Nido itinerary with Tour C to explore some of the islands located further away from El Nido.
Tip: To get the best deal, make sure to book your tour in advance on Klook here as it costs only 1,200 pesos compared to 1,400 pesos when booking in person!
CLICK HERE TO BOOK EL NIDO TOUR C

However, note that the eco-tourism development fee of 200 pesos isn’t included in the tour price. If you’ve already paid this fee on Tour A the day before, you won’t have to pay it again.
Keep in mind that the waves can be rough on Tour C, so if you’re prone to seasickness, be sure to take some medication before the tour.
That being said, I personally enjoyed Tour C more than Tour A because it was less crowded and I got to see more fish.
Below are the spots you’ll visit on Tour C:
Helicopter Island: Shaped like a helicopter, this is usually the first stop on Tour C. Although the waves can be a bit rough, you can still swim here. Luckily we had the beach almost to ourselves as we were among the first ones to arrive but keep in mind that it can be crowded after 10 a.m.

Hidden Beach: This beautiful white-sand beach is hidden behind a large rock formation and is only accessible by swimming. The coral is breathtaking and I even got the opportunity to see several clownfish.
Secret Beach: This is another beach that’s only accessible by swimming through a small opening in the limestone cliffs. The corals here are also beautiful and home to many colorful fish.
Matinloc Shrine: Some tour operators may skip this spot as it costs an additional 200 pesos per person to enter. However, I think it’s worth visiting because it offers a stunning view of the ocean and nearby islands, plus it takes only about 5 minutes to reach the viewpoint.
Cadlao Lagoon: The tour I booked also included kayaking at Cadlao Lagoon, which is normally part of Tour D. The lagoon features pointy rock formations, turquoise water, and stunning corals.

Related post: Detailed Review of EL Nido Tour C
4-Day El Nido Itinerary: Day 4
On day 4, I recommend hiking to Taraw Cliff early in the morning. You can then rent a motorbike or hire a tricycle to visit beaches and waterfalls further away from El Nido Town.
If you can’t ride a motorbike, you can instead join this jeepney tour organized by Frendz Hostel which includes visits to Lio Beach, Bulalacao Waterfalls, and Nacpan Beach.
The tour price includes all entrance fees, lunch, water, beach club access with unlimited cocktails, tour guide, and photographer.
CLICK HERE TO BOOK A JEEPNEY TOUR OF EL NIDO
Taraw Cliff Canopy Walk & Viewpoint
For a panoramic view of El Nido, make sure to add Taraw Cliff to your 4 day El Nido itinerary.
Previously, it was possible to hike to the top without a guide, but due to recent accidents, it is now mandatory to hire a guide.
For a safer and cheaper alternative, I recommend the canopy walk and viewpoint instead.

After a short but steep 15-minute hike through the forest and along a canopy bridge, you’ll finally arrive at a stunning viewpoint overlooking the turquoise ocean and towering mountains.
The entrance ticket costs 430 pesos for the canopy walk and viewpoint only or 730 pesos if you’d also like to add the dreamcatcher option which is another viewpoint.
Be sure to book your entrance ticket on Klook here to get a discount!

Harnesses and helmets are provided, and a guide will accompany you and help you take photos.
Tip: I recommend doing this activity early in the morning to avoid the heat.
Opening hours: 8 a.m to 5 p.m, daily
Lio Beach
After the hike, head to Lio Beach for a refreshing swim in the ocean. This beautiful white-sand beach is located near the airport so you can watch the planes land and take off as you cool off in the ocean.
The beach is lined with palm trees, providing plenty of shade to relax or you can rent sun loungers.

Bulalacao Waterfall
For another refreshing swim, you can also visit Bulalacao Waterfall. The waterfall can be reached after a 20-minute hike through the forest. The entrance fee for the waterfall is around 300 pesos, which includes a guide.
Another waterfall that you can visit is Nagkalit-kalit Waterfalls, but it’s further away, and you also need to pay an entrance fee and be accompanied by a guide.
Nacpan Beach
For a spectacular sunset, end your El Nido itinerary at Nacpan Beach.
This beach is one of the longest in El Nido and stretches all the way to Twin Beach, which is also worth visiting.
There are mostly expensive restaurants on the beach, but luckily there are also a couple of local restaurants that cater more to budget travelers.
You can rent sun loungers and umbrellas or find an empty spot under the shade of palm trees.
Note: The road leading to Nacpan is full of potholes, which can be challenging on a rainy day. Therefore, if you’re not experienced, I wouldn’t recommend riding a motorbike there.

Where to Stay in El Nido Palawan?
Since most of the island hopping tours don’t include hotel transfers, I recommend staying in El Nido Town so you’re within walking distance of the meeting point.
Additionally, staying in town means that you’ll have a better chance of finding affordable hotels, plus you’ll have easy access to restaurants, bars, shops, laundry shops, etc.
During my El Nido itinerary, I personally stayed at two hostels: Frendz Hostel and Spin Designer Hostel.
Both are located in the middle of town and offer various room types, including dorms (mixed and women-only) and private rooms. They also provide free high-speed Wi-Fi.

Frendz Hostel has a social vibe with super friendly staff. They even have a rooftop pool overlooking the ocean and offer daily activities like island hopping, karaoke, game nights, etc, making it easy to meet other travelers.
I stayed in their women-only dorm, which has 6 beds and an ensuite bathroom. They also have more bathrooms outside on each level.
Although it’s kind of a party hostel, they keep the noise down after 11 p.m so you can have a good night’s sleep. Check rates and availability for Frendz Hostel here.
Spin Designer Hostel, on the other hand, is quieter and better suited for those who don’t want to party every night. They are slightly more expensive than Frendz but the room rate includes a delicious buffet breakfast. Check rates and availability for Spin Designer Hostel here.
If you’re looking for affordable hotels outside of El Nido Town, Coron Corong Beach is a good option. For high-end resorts, it’s recommended to stay on Lio Beach or Nacpan Beach.
CLICK HERE FOR MORE HOTELS IN EL NIDO
How to get to El Nido?
If money isn’t an issue, you can fly directly from Manila to El Nido with Air Swift for approximately USD 100 for a one-way trip. Check latest price here.
For those on a budget, I suggest flying first into Puerto Princesa. Flight tickets from Manila to Puerto Princesa are much more affordable and start at USD 30 one-way. Check latest price here.
Once you land in Puerto Princesa, you can take a van to El Nido. The entire journey takes around 5-6 hours. The van will make a few stops along the way for food and toilet breaks. Check latest price for the van here.
If you’re coming from Port Barton, the total journey by van takes around 4 hours. Check latest price here.
If you’re coming from Coron, you can take a ferry which should take around 5 hours. Check price here.
Note: When arriving in El Nido by van or bus, you’ll be dropped off at El Nido Transport Terminal near Corong Corong Beach. To get to El Nido Town, you’ll then have to take a tricycle which should cost about 80-100 pesos.

Getting Around El Nido
Walking: If you’re only sticking to El Nido Town and doing the island hopping tours, you can easily get around on foot.
Motorbike: If you want to visit the attractions further away from town, you can instead rent a motorbike for about 500 pesos per day.
Tricycle: The tricycle is another option for getting around if you can’t ride a motorbike. A single trip starts at 50 pesos depending on the distance and your negotiation skills.
El Nido Travel Tips
Best time to visit
The best time to plan your El Nido itinerary is from December to April during the dry season.
May to November is considered the wet season, with July and August being the wettest months of the year.
I visited El Nido in November and had near-perfect weather except for one day when it rained for two hours in the morning.
Internet
Unfortunately, the internet coverage in El Nido isn’t the best, particularly on the islands and around Nacpan Beach but still works fairly well within El Nido Town.
If you need to buy a local sim card, you have the choice between Globe and Smart.
For convenience, I recommend buying your sim card at the airport since they have staff who will assist you in setting up the sim. The price of a sim card at Puerto Princesa Airport starts at 540 pesos or 1,500 pesos at Manila Airport.
If you’re on a tight budget, you can buy a sim card at any convenience store in El Nido instead.
I paid 65 pesos for a Globe sim card but had to go through the whole process of registering the sim card myself, which was a little complicated. Luckily, one of the staff at Frendz Hostel helped me so a huge shoutout to him!
ATMs
There are a few ATMs in El Nido that you can easily find by typing “ATM” on Google Maps.
Just make sure to only use the local ones like BPI or RCBC and avoid the Euronet ATMs as those have the highest fees and worst exchange rates.
I hope you found this 4 day El Nido itinerary helpful. If you have any questions about planning your trip, let me know in the comments.